 |
Kangaroo Mobile Desktop User Guide |
|
Copyright Notice |
Product Notice |
Disclaimer |
|
© Copyright 2015 InFocus Corporation Bluetooth is a trademark owned by its proprietor and used by InFocus Corporation under license. Intel is a trademark of Intel Corporation in the U.S. and other countries. Windows is a U.S. registered trademark of Microsoft Corporation. |
This guide describes features that are common to most models. Some features may not be available on your computer. Not all features are available in all editions of Windows. This computer may require upgraded and/or separately purchased hardware, drivers and/or software to take full advantage of Windows functionality. See http://www.microsoft.com for details
|
The information contained herein is subject to change without notice. The only warranties for InFocus products and services are set forth in the express warranty statements accompanying such products and services. Nothing herein should be construed as constituting an additional warranty. InFocus shall not be liable for technical or editorial errors or omissions contained herein.
|
Safety warning notice
 |
WARNING! To reduce the possibility of heat-related injuries or of overheating the computer, do not place the computer directly on your body or obstruct the computer air vents. Use the computer only on a hard, flat surface. Do not allow another hard surface, such as an adjoining optional printer, or a soft surface, such as pillows or rugs or clothing, to block airflow. Also, do not allow the AC adapter to come into contact with the skin or a soft surface, such as pillows or rugs or clothing, during operation. The computer and the AC adapter comply with the user-accessible surface temperature limits defined by the International Standard for Safety of Information Technology Equipment (IEC 60950). |
| 1. Getting to Know Your Computer | ||
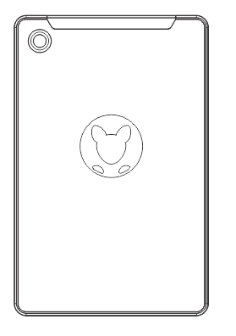
| Whats in the Box | ||
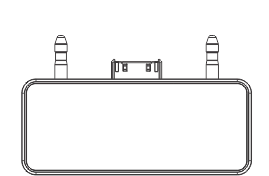
| Kangaroo Mobile Desktop | Kangaroo Dock | AC Adapter |
 |
 |
 |
| Component & Feature Illustrations | |||
|
|
|
|
|
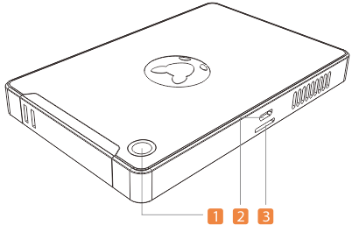
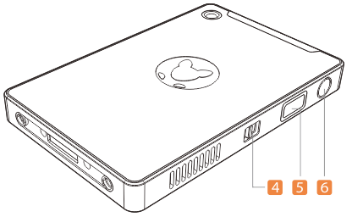

| Component & Features | Feature Descriptions | ||
| (1) | Power LED Indicator |
Blue: Powered on, and battery fully charged Amber: Battery Charging |
|
| (2) |  |
Micro SD Slot | Connect optional Micro SD memory cards to store, manage, share, or access information. |
| (3) |  |
Micro USB Port |
Connect a (5V/2A) Micro USB cable to charge the computer’s internal battery pack. Notice: The Micro USB port on this system can only be used to trickle charge the internal battery, and does not support data transfer. |
| (4) | Action Switch | Custom feature which allows you to use VNC control software to remotely control your computer. | |
| (5) | Fingerprint Reader | Allows login to Windows using biometric identification | |
| (6) | Power Button |
CAUTION: Pressing and holding down the power button results in the loss of unsaved information. If the computer has stopped responding and Windows® shutdown procedures are ineffective, press and hold the power button down for at least 5 seconds to turn off the computer. |
|
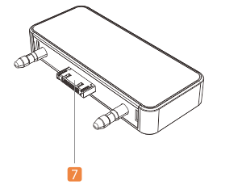
| (7) | Docking Connector |
Extend the capability of your Kangaroo Mobile Desktop by connecting Kangaroo compatible device extensions, such as the Kangaroo Dock, or Kangaroo compatible battery and storage extenders. |
|
| (8) |  |
HDMI (1.4b) |
Connects an optional video or audio device, such as an external monitor, high definition television, any compatible digital or audio component, or a high-speed HDMI device. |
| (9) |  |
USB 3.0 Port |
Connects optional USB 3.0 devices, such as a keyboard, mouse, external drive, printer, scanner or USB hub. |
| (10) | |
USB 2.0 Port | Connects optional USB 2.0 devices, such as a keyboard, mouse, external drive, printer, scanner or USB hub. |
| (11) | DC In | DC input for the AC adapter. | |
|
2. Quick Setup Guide |
|
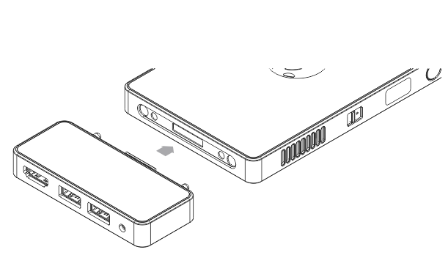
STEP-1: Attaching the Kangaroo Dock |
|
Attach the Kangaroo Mobile Desktop computing module to the Kangaroo Dock as shown in the illustration below.
|
|
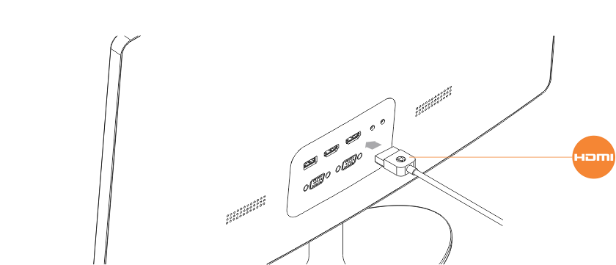
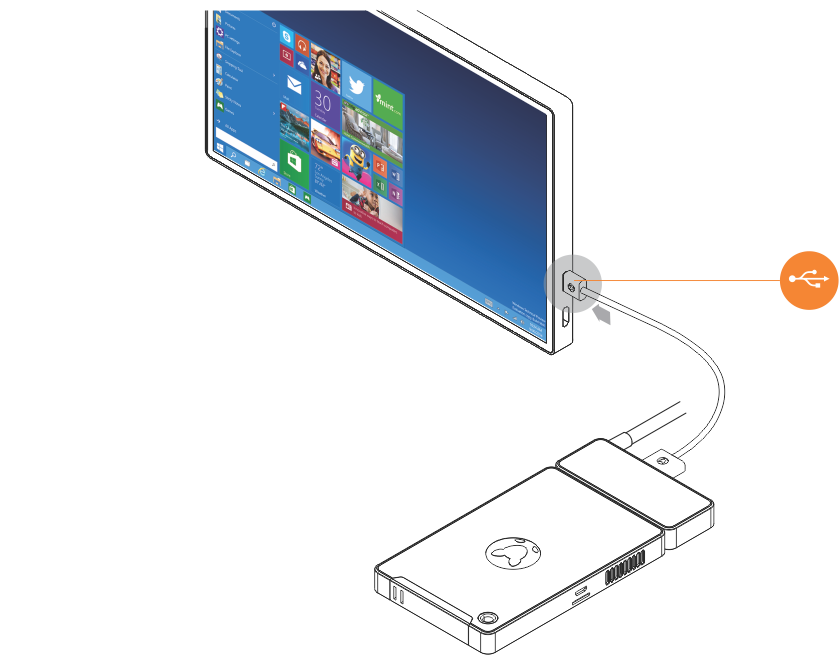
STEP-2: Connecting your HDMI Cable |
|
Attach an HDMI display cable, from your LCD monitor or television to the HDMI port on the Kangaroo Dock as shown.
Note: HDMI cable not included. |
|
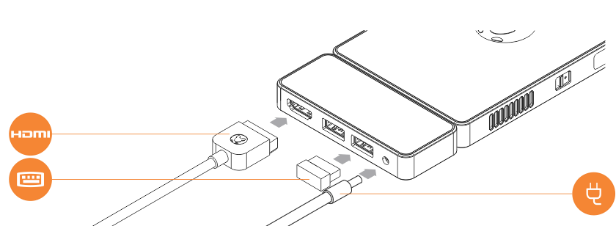
STEP-3: Attaching power and peripherals to the Kangaroo Dock |
|
Insert your USB keyboard/mouse controller into the USB port on the Kangaroo Dock, and attach the AC adapter.
|
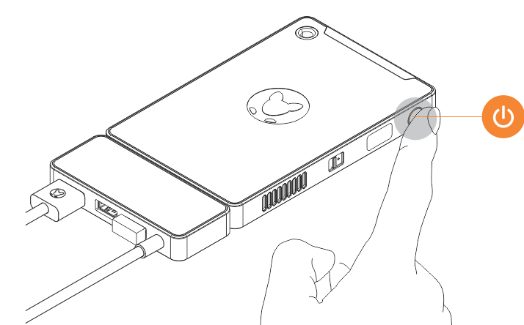
| STEP-4: Powering on the system for the first time. |
|
Press the power button on the computing module.
Important Note: To prepare the system for first-use, you must attach the AC Adapter and press the power button (for approximately 2 seconds).
|
|
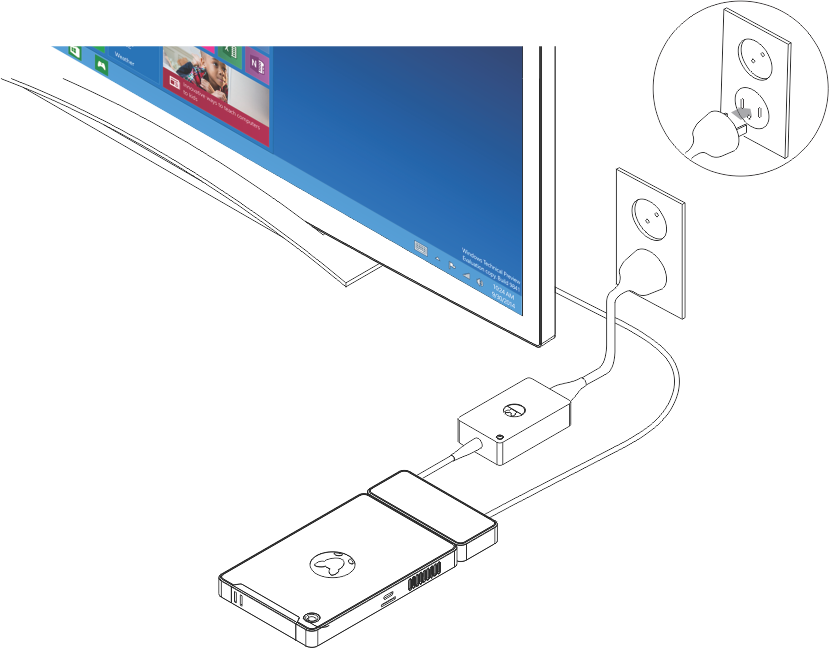
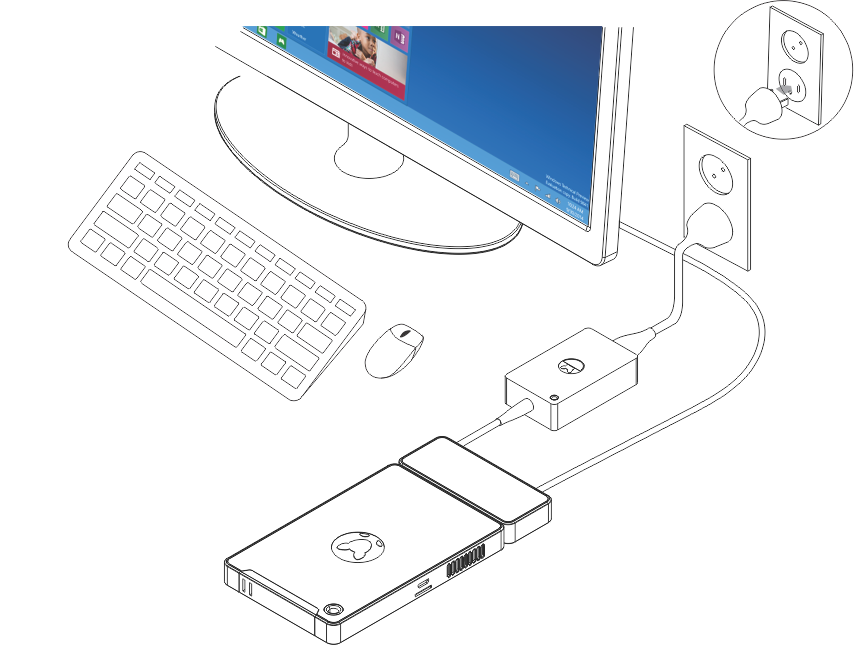
Desktop Configuration Example |
|
|
|
Home Entertainment Configuration Example |
 |
| 3. Using the Fingerprint Reader to Login Windows 10 |
| STEP-1: Configuring Password & Pin |
|
Click Start
If you don't already have an account password or PIN, click Add under the respective dialog and follow the onscreen instructions. |
|
STEP-2: Configuring Windows Hello |
|
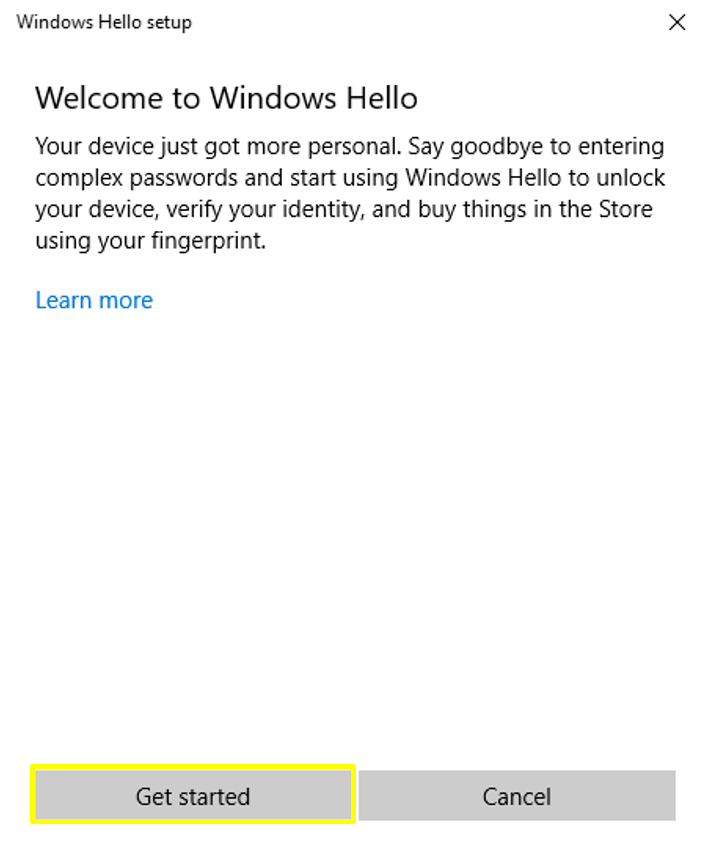
After configuring the account password and PIN, click Setup under the Windows Hello dialog: Start > Settings > Sign-in Options > Windows Hello > Setup > Get Started
|
|
Step-3: Fingerprint Registration |
|
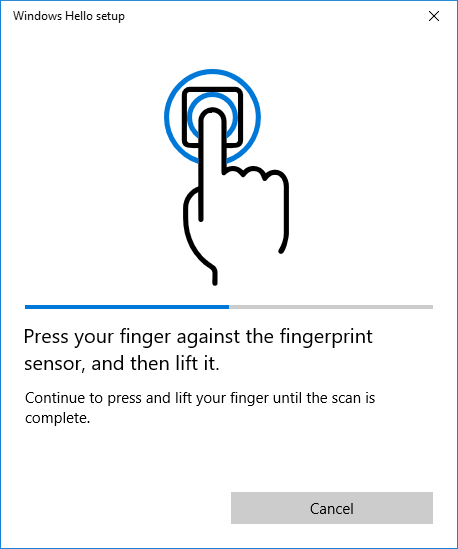
After clicking Get Started (above) you will be prompted to begin registering your fingerprints. Windows Hello Setup registers one fingerprint at a time, and will allow you to register at least 7 different angles/positions of the same print.
Note-2: The Kangaroo Mobile Desktop uses an area-based sensor to read the impressions on your fingertips. To scan your fingerprint, place your finger (do not swipe) firmly onto the surface of the sensor, and the sensor will do the rest. Note-1: Registering multiple angles for each print provides you with a better overall usability experience, as increasing the coverage provides a higher probability of successful recognition during normal daily use. |
|
Step-4: Register Additional Fingerprints |
|
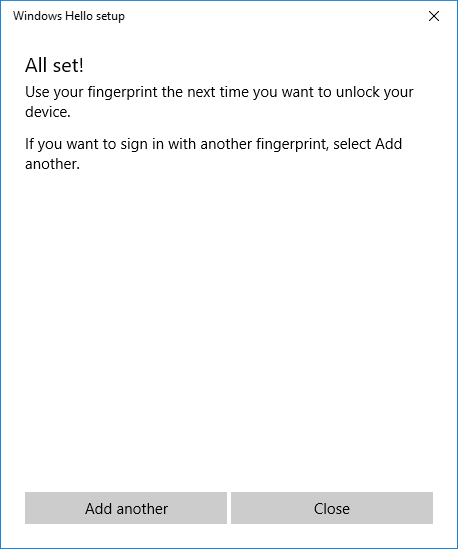
Registering multiple fingerprints makes using Windows Hello a little easier. Whether your system is sitting flat on your desk or your holding the product in your hand --registering additional prints allows you to use any registered fingerprint to login to your Windows PC.
That's it! So, next time you restart your PC, simply use one of your registered prints to login. |
 , then select Settings
  > Accounts > Sign-in options to set up Windows Hello.
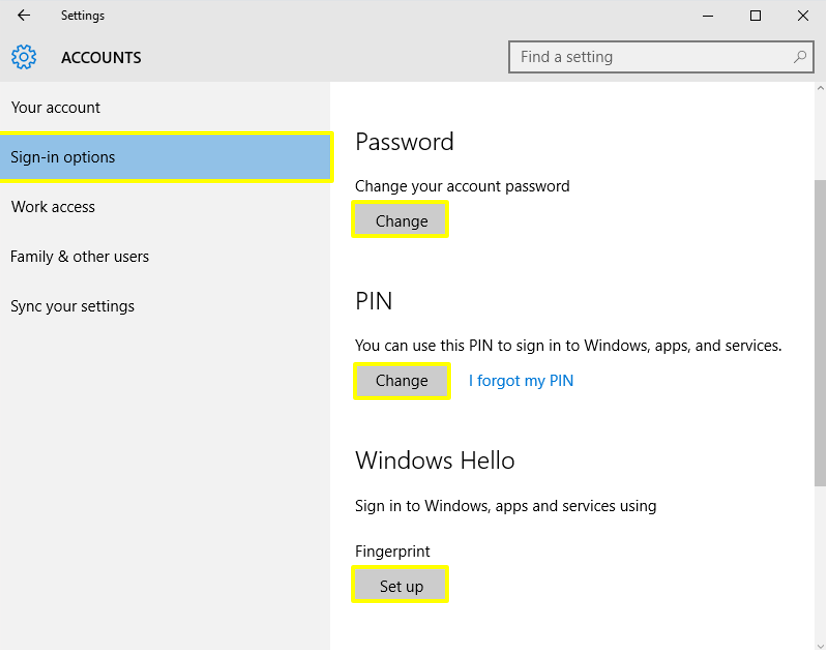
| 4. Using your iPad to control your Kangaroo Mobile Desktop |
| STEP-1: Download/install OSLinx for Windows |
|
Download OSLinx for Windows onto your Kangaroo Mobile Desktop computer. To download OSLinx for Windows:
|
|
STEP-2: Download/install OSLinx for iOS |
| Download and install OSLinx for iOS onto your iPad . To download OSLinx for iOS:
Note: OSLinx is not presently supported on iPhone or Android devices. |
| STEP-3: Open the apps and connect the devices |
|
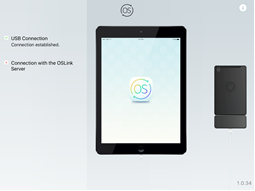
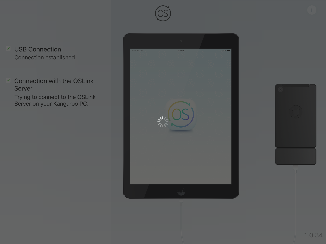
| STEP-4: Connection Established |
|
Once connected, your iOS device will negotiate the connection with the Kangaroo Mobile Desktop and display the following screens:
|
|
5. What is the Action Switch, and how does it work? |
|
Introduction The Action Switch is a simple [switch activated] hardware feature that allows you to connect, view and control your Kangaroo Mobile computer in a secure (disconnected) environment.
All Remote Desktop services available on the market today have one thing in common -- they require both the Host and Remote computers to be connected to internet (which allows IP based targeting) or operating on the same network with sharing enabled. The Action Switch requires neither.
Sliding the Action Switch on your Kangaroo Mobile Desktop (item 4 in the above Component & Feature illustrations) enables WiFi Direct mode on the Kangaroo Mobile Desktop, thus making your computer available (securely) to incoming connections.
What do we mean by disconnected? In an environment where network or internet access is not available, or desirable for security purposes, activating the Action Switch will allow you to connect to your Kangaroo Mobile Desktop and remotely view and control your computer using a range of other devices.
How do I use it? While Microsoft Windows 10 Professional includes all of the necessary protocols [to enable Remote Desktop services] by default, Windows 10 Home Edition explicitly excludes such services. Nevertheless, there are many Open Source VNC (Virtual Network computing) solutions available that will allow you to enable Remote Desktop/Access capability on a Windows Home Edition version of the Microsoft Windows 10 operating system. |
|
Using VNC Software to securely connect your Kangaroo Mobile Desktop |
|
What VNC software should I use? One of the great things about VNC software is that much on the market today remains Open Source, and there are many popular solutions available which enable remote connections using a variety of devices, such as Android, iOS and Linux. And most importantly, many of them are free for non-commercial use, and can be used independent of the Action Switch when both Host and Remote computers are either connected to the internet or operating on the same network.
Following are a few of the popular solutions that we've been playing with:
Please Note:
Definitions
What do I need to get started? Both devices (host and client) need to be running a compatible VNC solution. This means that you will need to locate and download a VNC Server application to the host (i.e., your Kangaroo Mobile Desktop), and a VNC Client application (or viewer) to your remote device (your Windows, iOS or Android device).
Getting Connected - Basic Procedures
Note: Once the VNC software is activated on both Host and Client devices all you need to establish the connection is a common set of credentials (IP address, authentications pass code, or username and password of the Host computer). Each VNC software differs slightly in their secure authentication methods, so this will require a basic understanding the VNC software that you've installed.
The following example assumes you have already installed the relevant VNC software on both the Kangaroo Mobile Desktop and the Remote device that you wish to use to control your Kangaroo product. |
|
Preparing for a Remote Connection |
|
| Using a Remote Device to Connect to the Kangaroo via WiFi Direct |
Important Note: To establish the connection between the two computers you may be required to specify the IP address or computer name of the Host computer and use the credentials (username and password) to login using the remote device. |

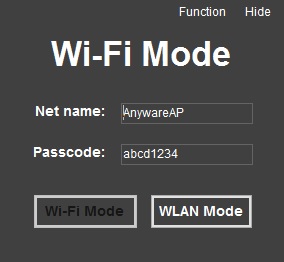
It would be helpful if the application that allows you to change the Wi-Fi Direct AP name and password also shows the IP information for the Wi-Fi Direct network. The Kangaroo gave me a 192.168.173.x address, and I assumed 192.168.173.1 would be the Kangaroo. I was right, but a novice user might have more problems with this.